📑 Table of Contents
- 1. What Is a Webhook (And Why You Need One)
- 2. Webhook vs Polling — Why It Matters for B2B
- 3. The 5-Minute n8n Webhook Setup
- 4. Understanding the Webhook Node UI
- 5. Real Example — Lead Response Webhook
- 6. Securing Your n8n Webhook (Don't Skip This)
- 7. Troubleshooting Common n8n Webhook Errors
- 8. Production Deployment Checklist
- 9. Final Thoughts
- 10. Frequently Asked Questions
This guide is Part 2 of our n8n Series. If you're new to n8n, start with the n8n Workflow Automation Guide first.
What Is a Webhook (And Why You Need One)
A webhook is an HTTP endpoint that another app can call to trigger your workflow. That's it. One URL. One trigger. Instant execution.
Compare it to polling. Polling means your workflow wakes up every 5 minutes, asks "any new data?", gets "no" nine times, then "yes" on the tenth. Wasteful. Slow. Expensive at scale.
A webhook flips this. Instead of you asking, the other system tells you. The moment a form submits, Stripe charges a card, or Airtable adds a row — your webhook fires. Zero delay. Zero wasted executions.
Think of it like a restaurant. Polling is you calling every 5 minutes to ask if your food is ready. A webhook is the restaurant calling you the second the plate hits the counter.
One more thing: a webhook is not an API. An API is what you call. A webhook is what calls you. Related, but not the same.
Webhook vs Polling — Why It Matters for B2B
Most tutorials gloss over this. It's the most important architectural decision you'll make for your automation stack.
| Aspect | Polling | Webhook |
|---|---|---|
| Trigger | Scheduled (every X minutes) | Instant (event-driven) |
| Cost | High — burns executions even with no data | Low — fires only on real events |
| Latency | Up to X minutes delay | Under 1 second |
| Best for | APIs without webhook support | Real-time events (forms, payments, messages) |
Here's the real cost. If you poll 20 apps every 5 minutes in n8n Cloud, you're burning 5,760 executions per day.
At n8n's Starter tier (€24/month or ~$26 USD for 2,500 executions, as of September 2026), you'd exhaust your monthly quota in roughly 10 hours of continuous polling. That's why webhooks win — they fire only on real events.
Now consider the lead response workflow I covered in the HVAC lead response article. A company gets 30 leads per day. With polling, that's 288 checks per day just to catch 30 events. With webhooks, it's exactly 30 executions.
Same result. 10x less cost. And 100x less latency.
In local services specifically, speed-to-lead is everything. Research from InsideSales and MIT's Lead Response Management study found that contacting a lead within 5 minutes (vs. 30 minutes) makes you 21x more likely to qualify that lead. Some industry benchmarks cite even higher multiples, but the 21x figure is the most defensible from the primary source. Velocify's 2012 benchmark put it more conservatively at 391% higher conversion when responding within 1 minute. Either way — webhooks make that 1-minute window actually possible.
The 5-Minute n8n Webhook Setup
Let's build one. Open your n8n instance — Cloud or self-hosted, both work the same here.
Step 1: Create a new workflow. Click "+" in the top-right corner. You'll get an empty canvas.
Step 2: Add the Webhook node. Click the "+" node button. Search "Webhook". Select Webhook (not "Webhook Response" — different node). Full node documentation is at docs.n8n.io.
Step 3: Configure the HTTP method. In the node panel, set HTTP Method to POST. Use POST for incoming data (form submissions, API callbacks). Use GET only when you need a simple trigger without payload.
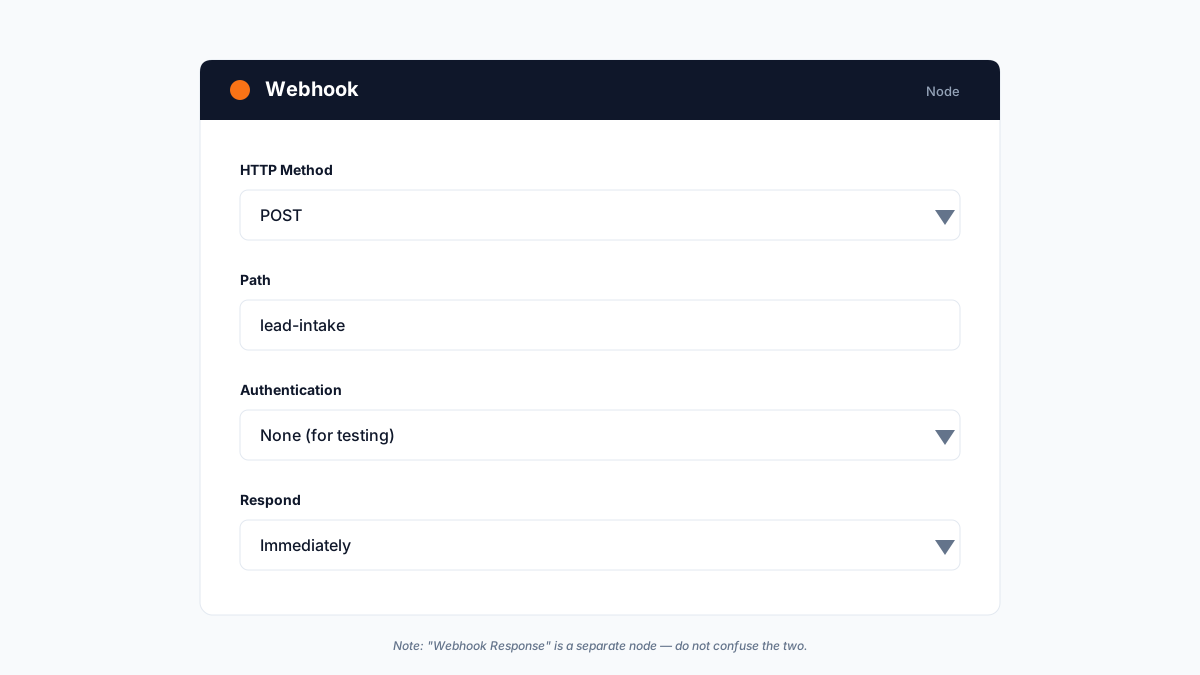
Step 4: Set the webhook path. This becomes the last part of your URL. Give it something descriptive: lead-intake, stripe-webhook, form-submit. Avoid generic names like webhook1 — you'll forget what it does in a week.
Step 5: Choose authentication. For now, leave it as "None" so you can test. We'll lock it down in Section 6. Never leave this at "None" in production.
Step 6: Test the webhook. Click Listen for Test Event at the top of the node panel. n8n starts listening and shows you a Test URL. Copy it.
Open a new browser tab. Paste the URL. You should see:
{"message":"Workflow was started"}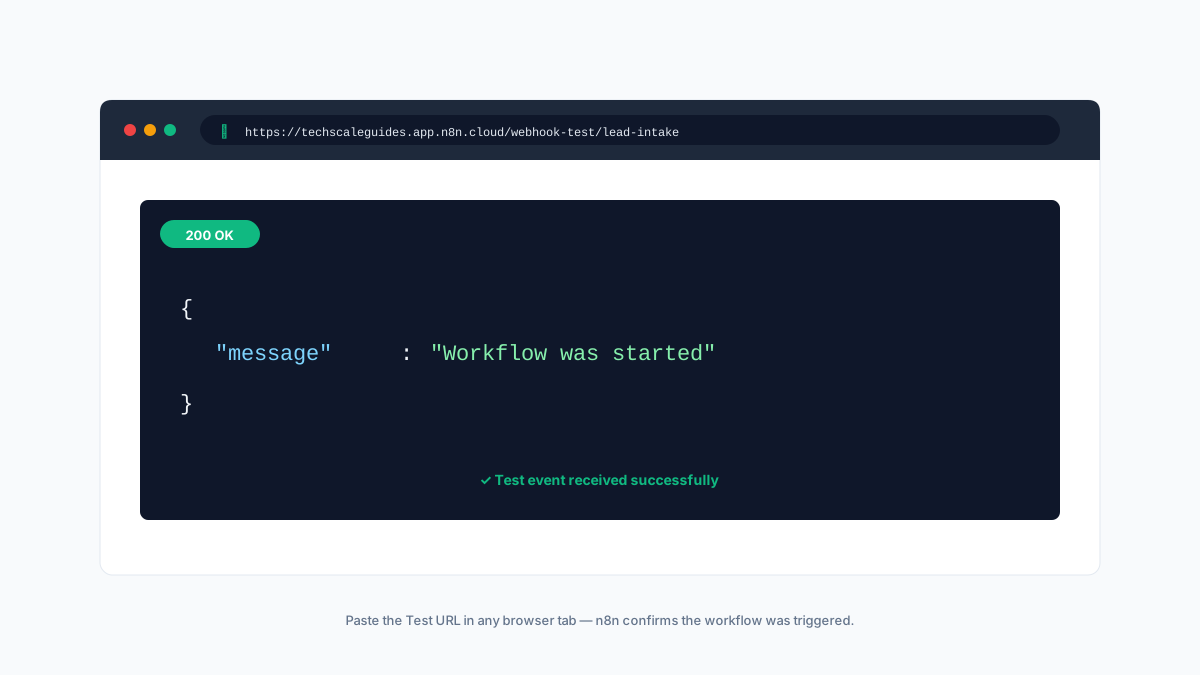
That's it. You just built your first webhook. From here, whatever you attach after the Webhook node runs the instant an event fires.
Understanding the Webhook Node UI
Before you build anything real, get familiar with the 5 fields that trip up every beginner. I've watched people lose an hour on a misconfigured dropdown.
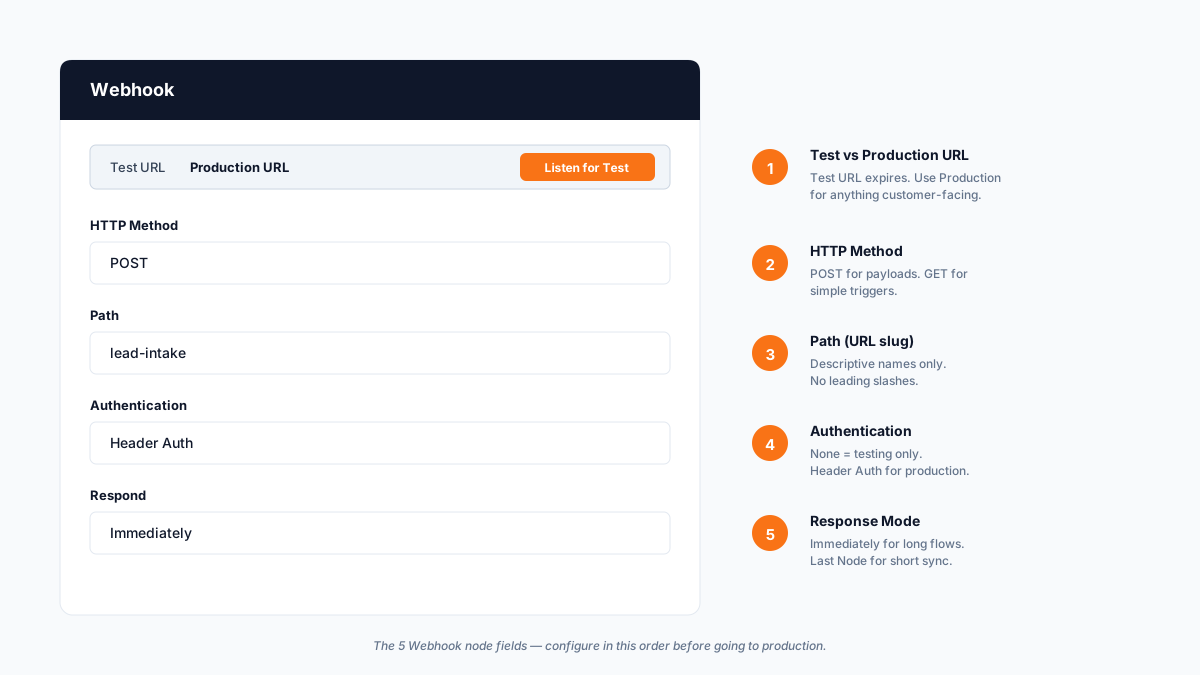
Test URL vs Production URL
This is the #1 mistake I see. The Test URL only works while you're actively listening in the editor. Close the tab, it dies. The Production URL works 24/7 — but only after you toggle the workflow Active in the top-right corner.
Beginners wire up their test URL into a live form, then wonder why it stopped working three hours later. Always use the Production URL for anything customer-facing.
HTTP Method Dropdown
POST for anything with a payload. GET for simple triggers (like a health check). PUT/PATCH/DELETE exist but you'll rarely need them for inbound triggers. For the full HTTP method spec, see MDN's HTTP reference.
Path Field
This is the slug. my-workflow/lead-intake is fine. lead-intake is cleaner. Don't include leading slashes.
Authentication Dropdown
None (testing only), Basic Auth (username/password in header), Header Auth (custom header key). We cover all three in Section 6.
Respond Dropdown
Three options that mean very different things:
- Immediately: Sends 200 OK back to the caller instantly. Workflow runs async. Best for long-running workflows that would time out otherwise.
- When Last Node Finishes: Returns the workflow's output. Caller waits. Best for short flows where the response matters.
- Using Respond to Webhook Node: Manual control — you place a "Respond to Webhook" node wherever you want to return a response. Best for complex logic.
Default to "Immediately" unless you have a specific reason to wait.
Real Example — Lead Response Webhook
Time to build something real. Here's the webhook configuration from a lead-response workflow I deployed last week for a contractor client.
The entry point is a webhook that receives leads from the company's website form. Here's the full flow:
- Website form submits → POST to n8n Production URL
- Webhook node receives JSON payload:
{name, phone, message, source, timestamp} - Data passes to an AI scoring node (determines hot/warm/cold)
- Scoring result routes to either instant SMS (hot) or email (warm/cold)
- Follow-up sequence triggers within 60 seconds
The webhook configuration itself is dead simple: POST method, path lead-intake, Header Auth enabled. The complexity lives downstream.
Here's the JSON payload structure the website form sends:
{
  "name": "John Smith",
  "phone": "+1-555-0123",
  "message": "AC unit not cooling, need same-day service",
  "source": "website_contact_form",
  "timestamp": "2026-09-15T14:32:11Z"
}
In the next node, you reference this via {{ $json.body.name }} and similar expressions. n8n automatically parses the body into accessible fields once the Content-Type header is correct.
The full workflow — including AI scoring and the SMS handoff — is documented in my HVAC lead response automation guide. But the webhook is the entry point. Get that wrong, nothing downstream matters.
One gotcha: n8n prefixes everything with body, query, or headers depending on where the data came from. If you POST JSON, use $json.body.fieldname. If you send data as query params, use $json.query.fieldname. Miss that prefix, you get empty results.
Securing Your n8n Webhook (Don't Skip This)
An unsecured webhook is a public endpoint that anyone can POST to. If your workflow triggers paid APIs (SMS, OpenAI calls), a bad actor can drain your balance in hours. Here's how to lock it down — in order of importance.
Layer 1: Header Authentication
The simplest production-grade option. In the Webhook node, set Authentication to "Header Auth." Define a header name (e.g., X-Webhook-Secret) and a value (a random 32+ character string). Any request without that exact header returns 403.
On the sender side, they include the header in every POST. Most form builders, Zapier integrations, and custom code can do this trivially.
Layer 2: HMAC Signature Verification
If your provider supports it (Stripe, GitHub, Shopify), use HMAC signatures. They hash the payload plus a shared secret — so even if someone steals your webhook URL, they can't forge a valid signature without the secret. For a technical explanation of HMAC, see Wikipedia's HMAC entry.
n8n doesn't handle HMAC natively in the Webhook node. You'll need a Code node immediately after that verifies the signature. Test this carefully — getting the raw body extraction right is fiddly.
Layer 3: IP Allowlisting
n8n 1.x supports restricting the Webhook node to specific IPs or CIDR ranges. If your sender publishes their IP ranges (Stripe does, GitHub does), enable this. Now only that provider can trigger your webhook.
Caveat: CIDR notation support was improved in later 1.x releases. If you're running an older self-hosted version, test CIDR matching before relying on it in production.
Layer 4: Rate Limiting
n8n Cloud does not have built-in webhook rate limiting — a gap that surprised me when I first hit it. Self-hosted instances don't have it either. For production deployments handling public traffic, you'll need one of:
- A reverse proxy (Nginx, Caddy) with rate limit rules in front of your n8n instance
- A dedicated webhook gateway like Hookdeck that sits between the sender and n8n
- Cloudflare Rate Limiting (if you're on a Cloudflare proxied setup)
Skipping this layer is how you discover a problem at 2 AM when someone scrapes your endpoint.
Troubleshooting Common n8n Webhook Errors
These are the five errors I see most often. Bookmark this section — you'll come back to it.
| Error | Cause | Fix |
|---|---|---|
| "Workflow could not be started" | Workflow is inactive | Toggle the Active switch in the top-right corner of the editor |
| 404 on the webhook URL | Using Test URL after test session ended | Switch to the Production URL and verify workflow is Active |
| Empty payload in next node | Wrong Content-Type or missing body prefix |
Check headers, use $json.body.field not $json.field |
| Webhook fires twice | No idempotency handling | Add dedup logic — check a unique message ID against a cache |
| Request times out after 30s | Sync response on a long workflow | Set "Respond: Immediately" so n8n returns 200 before workflow completes |
Two more edge cases worth knowing. First: workflow execution time limits vary by plan. n8n Cloud Starter caps at 5 minutes per execution; higher tiers extend this. Verify current limits at the n8n pricing page before designing long-running workflows. Second: if the sender doesn't include a Content-Type header, n8n treats the body as raw string. You'll need to parse it manually.
Production Deployment Checklist
Before you wire your webhook into anything customer-facing, run through this list. Every item, every time.
- ✅ Webhook URL uses HTTPS (n8n Cloud does this automatically; self-hosted needs valid SSL cert)
- ✅ Authentication enabled — Header Auth minimum, HMAC if provider supports it
- ✅ Respond mode set intentionally (Immediately for long flows, Last Node for short ones)
- ✅ Error workflow configured — routes failed executions to a Slack/email alert
- ✅ Logs enabled for debugging (n8n Settings → Log Streaming for Cloud)
- ✅ Rate limit monitored — check n8n Insights tab weekly
- ✅ Idempotency handled — dedup by unique event ID to prevent double-processing
- ✅ Secret rotation plan — rotate Header Auth keys every 90 days
The last two items are what separate a hobbyist from a production engineer. Idempotency in particular — if your sender retries on network errors, you'll process the same lead twice without dedup. For a lead-response workflow, that means two SMS to the same customer. Ugly.
Final Thoughts
Three things to take away from this tutorial:
- Webhooks beat polling for anything real-time. The cost and latency math is not close. If your trigger source supports webhooks, use them.
- Setup takes 5 minutes; securing takes 30. The tutorial part is easy. The authentication, idempotency, and error handling are what make webhooks production-grade.
- Test URL ≠ Production URL. Never confuse the two. Never ship a workflow with the test URL wired in.
If you're just starting with n8n, work through the n8n workflow automation guide first — it covers the foundations before you get to webhooks. Then come back here and build something real.
For deeper architecture patterns — like how webhooks fit into multi-agent AI systems — the AI agent architecture blueprint covers the bigger picture. Webhooks are one piece of the puzzle. The blueprint shows how they connect to everything else.
Now go build. And this time, secure the endpoint before you tell anyone about it.
Frequently Asked Questions
1. What is a webhook in n8n?
A webhook in n8n is an HTTP endpoint that triggers a workflow when another app sends a request to it. It runs on a Webhook node — the entry point of the workflow. Any app that can make an HTTP request (form builders, Stripe, Shopify, custom code) can trigger the workflow by calling the webhook URL.
2. Is an n8n webhook secure?
By default, no. A webhook with Authentication set to "None" is a public endpoint anyone can POST to. For production, enable at least Header Auth (shared secret header), and ideally add HMAC signature verification if your provider supports it (Stripe, GitHub, Shopify). n8n Cloud does not have built-in webhook rate limiting, so add a reverse proxy or webhook gateway for public-facing endpoints.
3. What's the difference between Test URL and Production URL?
The Test URL only works while you're actively listening in the editor — it expires when you close the tab. The Production URL works 24/7 but only after you activate the workflow. Always use the Production URL for anything customer-facing. This is the #1 mistake beginners make.
4. Can I use n8n webhooks on a self-hosted instance?
Yes. Self-hosted n8n supports webhooks the same way n8n Cloud does. However, self-hosted instances do not include built-in rate limiting or automatic HTTPS — you'll need a reverse proxy (Nginx, Caddy) with SSL termination and rate limit rules for production deployments.
5. How many webhooks can one n8n workflow have?
A single n8n workflow can have multiple Webhook nodes, each with its own path and configuration. However, best practice is one webhook per workflow for clarity and easier error handling. If you need multiple entry points, split them into separate workflows and chain them with a Webhook-to-Webhook call or a shared queue.
6. Does the n8n Webhook node support binary payloads?
Yes. In the Webhook node's Options, you can specify a "Binary Property" that tells n8n where to store binary data from the incoming request (files, images, PDFs). Downstream nodes can then read this property and process the binary content — upload to S3, forward to email, or pass to a vision model. For text-only webhooks (the common case), you don't need to configure this.
7. How do I test an n8n webhook without a real sender?
Click "Listen for Test Event" on the Webhook node, copy the Test URL, and paste it into a browser tab for a GET request — or use curl for POST requests with a sample payload. For more complex testing, tools like Postman or Insomnia let you craft custom headers and bodies to simulate real sender behavior.